Friday, February 27, 2009

Polish, Polish, Polish..........

Gel coat, paint, and stainless steel; pretty much sums up everything else on US 111. She may have a pretty wood cabin and teak decks, but the rest of her is a pretty standard fiberglass folkboat.
Her hull is white gel coat, with a dark blue waterline. Gel coat is a pretty forgiving material to work with, and quite easy to maintain; as long as you are willing to put in the elbow grease from time to time. I will warn you all now though, that a nordic folkboat is one of the most time consuming boats to rub out and polish if you have previously let it get away from you. Another note, the process that I am describing below is not for a painted hull.

I start by wiping the entire hull down with acetone. This will remove any built up wax residue. Then I apply 3-4 coats of the 3M Heavy Duty Rubbing Compound. (I have used just about every product on the market today, and the 3M line is hands down the best out there) Buffing each coat with an electric polishing machine. Please remember that there is a grit in the rubbing compound, and that you are actually sanding the gel coat. If you come to a spot with minor scratches, an extra coat or two will not hurt it. Most blemish's can be removed this way. (Another side note: Gel coat will burn and discolor if you are too aggressive with the polisher. The bottom edge of each strake is notorious for this)

The hull is looking pretty good at this point, but don't fall into the trap that a lot of people do. Finish it. Once I have completed rubbing the hull out, it is time to start polishing. I start by wiping the entire hull down again with acetone, or hot to warm water. This will remove any left behind compound; then dry completely. It is very important to have a dry surface, or the polishing compound will not be as effective. Using the 3M Finesse It polishing compound, I apply 3-4 coats and buff to a high sheen. This will leave the hull with a nice "Wet" look. Wipe any haze left behind with a soft dry cloth, and you are done. Sounds easy enough, but US 111 took me approximately 15 hours to complete.

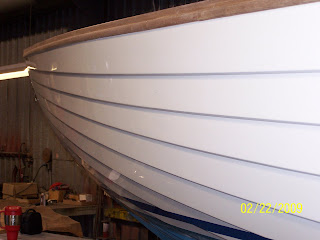
This is the point that you can apply any Fancy speed secrets that you may have. Anything from carnuba wax, to the super slick Teflon waxes available in your local marine stores. I'll leave that decision to you. I am completely happy with the way that she polished out, and the added work now, leaves less in the future. As long as I stay off the docks, watch things floating by in the water, not hit anyone, and hose the hull down after each day of racing, I will only need to apply 1-2 coats of the polishing compound each season to keep her looking sharp.

Tuesday, February 10, 2009

Like Frosting on A Cake.......

Okay, not really...... But looks similar. While waiting for the varnish to completely cure and dry, we could move our efforts elsewhere. The best move for us was to the cabin top. Originally we were planning on simply filling the chipped gel coat and polishing out the cabin top. Once stripped of all the hardware and everything else that had been glued down; it was very clear we needed to take a more drastic approach. All the hardware seemed to come off a little harder then I had expected. Even the wood handrails pulled the gel coat off down to the fiberglass below. Next to the jib leads someone had placed white non-slip tape to cover the divots in the gel coat from the blocks hitting it. At one point in time the boat had a second set of organizers that served as turning blocks. Those since have been removed and the holes patched. Too many issues to just fill and polish. So that leaves us no other choice then to just refinish the entire cabin top.

We started by sanding the gel coat. We do not really have the time to put a coat of fairing compound over the entire cabin top, but we could use the gel coat and then add the fairing compound in just the low spots to build them up. We then sanded everything smooth with 180 grit sandpaper and tapped it all off for painting.

We first sprayed two coats of Sterlings, linear polyurethane primer and allowed it to cure overnight. The following morning applied 3M spot putty to any pin holes and spots that we missed and allowed it to dry. An hour of shooting the shit and cleaning up the mess around the shop, the putty was dry and we could sand the cabin top with 220 grit; preparing for the final gloss coats.

Using Sterlings, linear polyurethane (Three part) top coat. Sterling is a high solids, low VOC sprayable gloss coat; that in the past we have great luck with. We sprayed one tack coat, allowed to dry for 60 mins. and then applied a heavier second coat for color. After about 30 mins. the paint is cured enough that we could remove the tape and allow it to dry to the touch overnight. Below is a picture of the cabin top the following morning.You can not really tell in this picture, but our janitorial crew played havoc again. They must have come in just after we left for the night and swept the shop, because there was a ton of dust in the paint. In most cases, this particular top coat continues to shrink for some time as it cures, and most of the dust will just pop out. Seven days later, we decided to bite the bullet and color sand and polish out the cabin top. Not exactly what we wanted to waste our time doing, but a job worth doing is a job worth doing right.

First you sand the entire cabin top with 600 grit, then followed by 1000 grit, then by 1500 grit and finally with 2000 grit. Four coats of rubbing compound, followed by four coats of polishing compound, about 3 days and this is what you have...............

Not too bad for a couple of beginners......... So, this may not be the first boat that we have rebuilt; but nevertheless we are very happy with the way that this portion of the project turned out. Next up; the phenolic is here, and a couple more coats of varnish, then put everything back together and head below the waterline.

Sunday, February 1, 2009

The Evolution of Good Varnish

A little back history.........My grandfather owned a couple of sailboats, first was a Cheoy Lee Offshore 27 and later a C&C 41. The Cheoy Lee was your typical offshore 27, lots of wood and tons of varnish. The C&C was the opposite. Just a small amount of wood work on trim pieces and such. I tell you this because I could never figure out where my father learned how to varnish. Well, according to him, my grandfather puts varnish on like he is whitewashing the back fence. So, as the story goes, my father had two choices; he could clean up after his father and redo it when he wasn't looking or learn to varnish and clean up after just himself; and that was where it all started.
I was 8 when my father bought his first boat. It was Thea, USA 108, also a Nordic Folkboat. At that time there wasn't much wood to varnish on her. A matter of fact, everything that needed varnishing could be thrown in the back of the truck and done in our garage; minus the toe rail. I remember sitting in the garage for hours on end, watching and asking millions of stupid questions. Come on, I mastered water colors in pre-school; how hard could this be? Boy was I wrong. I would bug him to let me try, and constantly he would tell me no. Every once in a while the planets would align just right, or he was tired of me begging and he would let me put some varnish on. It was usually on something unseen by anybody, like the bottom of the traveler. I learned then that you could screw up in a matter of seconds, and my moment to shine was short lived. He would fix what I messed up in the ten seconds that I had the brush in my hand, and I would go back to watching.

At the age of 27, I was given my own tub of varnish and a brush for the first time. I like to think that it was because he knew that I was watching and learning, asking all the right questions; but it wasn't. The Truth of the story was that the list of projects was taking longer then expected and he needed to get his boat in the water. Even at the age of 27 I was proud of the job that I did on the bottom side of the decks in the cabin. It wasn't long until I figured out that it was another place that no one would ever look. The following winter, his list was once again long, and he decided that it was my job to re-finish the mast. Since then I have been trusted to varnish just about everything, except the final coat on anything. To make a long story a little shorter, I am 32 years old now, and it is finally looking like I may get to finish a job.

Now when I say that varnish evolves, I mean just that. You can't just sand a piece of wood and slap some varnish on. You need to take your time, and remember that half of it is in the prep work. The sanding alone can be the difference between dinning room furniture and patio furniture. In the pictures below, most of the prep work has been completed. Everything that is going to be stained and varnished has been sanded first with 80 grit, then with 240 grit to remove the sanding marks. We then tapped everything off. (And yes, we now own stock in 3M masking tape)
Just before we left for the evening we vacuumed the cockpit, and blew the entire boat off. The following morning we would start the staining process.

The next day was spent doing just that, staining. I felt like the Karate Kid, "Wax on, Wax off." A whole day of it. It is pretty simple, apply a hearty amount of stain to the wood, let sit and wipe it off when it has absorbed to the desired color. It is just a messy job, and the stain then has to dry overnight, so you really don't know what the finished product even looks like until morning.

We are now into day three. We liked the color, and are planning on 10-12 coats of varnish before we are done. With tack rags in hand, we started the first coat. The first coat is a tricky one. When varnishing stained wood there really is not a good sealer that you can use without making the stain look blotchy, so we have found that you mix the varnish with 25% brushing thinner. The issue comes from the varnish being very thin, but it's just the first coat, so a light coat is okay. Day 4 we sanded lightly with 320 grit sand paper, wiped the entire boat down with paint thinner and applied coat number two. We repeated these steps on day 5 and day 6. This is what the wood looked like after 4 coats.Just after we left when finishing the forth coat, our janitorial crew came in to sweep out the shop for the following week. As you can tell from these pictures, they stirred up a ton of dust. Dust is not a friend when you are varnishing........

Coats 2,3 and 4 are pretty thick and it is time to plane down the varnish. We do this by sanding again with 320 grit sand paper. This time concentrating on making it fair and flat. Most of the wood grain is filled, and the remaining coats will continue to build in thickness. We cut and strip the tape. Re-Tape the entire boat again, moving the tape to the outside edge of the caulking around the deck. This will help seal the king plank and margin boards from any water sneaking through at the caulking joint. Day 7 and 8 were spent finishing all of this up.

Day 9 started with wiping down the entire boat with paint thinner and ended with applying coat 5. From coat 5 on, we let each new coat of varnish cure for two days in between. It has been cold and damp for the most part, and it is better safe then sorry. Day 10 we stayed busy working on other parts of the boat. Day 11 we sanded and applied coat 6. This was the schedule up to day 15 when we applied coat 8. These pictures were taken just after finishing coat 8.


This is were we are currently. We will stop varnishing for a few days, letting the varnish cure and move our efforts to re-finishing the cabin top, putting the phenolic on top of the cockpit combing, and polishing out the hull. I figure if we have any mishaps while these projects are being completed we still have at least 2 coats to go, to fix them.

Teak Decks Look Great, But Need a lot of Upkeep....Or Do They?

This was another one of the many projects that we have on our list. We have read many articles on refinishing teak deacks, and everyone seems to have an opinion on the subject. So, here is our two cents on it.

Teak is a natural hard wood, that is as pretty unfinished as it is oiled or varnished. Unfinished; teak will turn silver in color over time. USA 111 has teak decks, that for 23 years have had nothing done to them, except for a weekly summer bath of sea spray followed by a shower of fresh water and the occasional scrub with soap.The decks have turned silver, just as they should. The problem however is that over the years of washing and scrubbing, the soft grain in the teak has been removed. With the soft grain removed, we now have ridges in the wood, where dirt and mildew like to lurk. This happens in many ways. One is the stiffness of the bristles on the brush that you are using, another is a strong, direct spray of water from the nozzle on the hose. We believe that both have lead to our problem. Now the only question is, how do you fix it?
There are many products on the market that claim to refinish teak, without removing the soft grain. After trying most of them over years of boat repair and refinishing, I can say there are none. Actually, I haven't even found one that makes the teak look like the picture on the box by just following their simple directions. The most common issue that I find is that all the products on the market require you to scrub some sort of cleaner into the teak with a brush, which removes the soft grain.

Here is our answer........ I started by heading to West Marine and purchasing StarBrite brand Teak Cleaner (The gel formula) and the StarBrite brand Teak Brightener. They are not the cheapest products on the market, about $50 for the both of them, but I have found that they do the best job on the cleaning portion of the work. It is pretty simple. Start with a clean, dry deck. Then apply a healthy coat of the teak cleaner gel with a disposable paint brush over the teak in which you are cleaning; and remeber to only apply the product to an area that you can complete in about 5 minuts. (On the deck I did an area approx. 2' x 4' at a time) The teak cleaner is nothing more then a highly consentrated soap, and starts to soak into the wood turning it a dark color. Let the cleaner sit for about 5 minutes, then scrub with a scotch brite pad; working the cleaner into the grain of the teak. With warm fresh water, wash the cleaner from the teak. Then clean up the excess water with a dry towel. While the teak is still damp, apply a generous amount of the teak brightner with a disposable paint brush, and let dry overnight. (Do not wipe it off)

In this picture, I have cleaned the small area on the left and let it dry overnight. The entire right side was cleaned earlier in the day and was still a bit damp. Almost all of the silver in the teak is gone, and there is no dirt or mildew in the grain. I cleaned the entire deck this way. Half of the problem is solved. Now to retore the soft grain in the teak and make the deck look as good as new.
After the decks had a chance to completely dry, we started the refinishing part of the project. First off we sanded the entire deck with 40 grit sand paper. When finished we then sanded the entire deck again with 80 grit sand paper. If that wasn't enough sanding, we again sanded the entire deck one last time with 180 grit sand paper.


This is the deck after sanding with 40 grit sand paper.


This is the deck after sanding with 80 grit sand paper.

After sanding the deck the last time, we jumped right in and started tapping off the deck to get ready to stain and varnish; So needless to say, I don't have any pictures of the final sanding. I guess you'll just have to wait until we are done varnishing to see the end result............